Note
Access to this page requires authorization. You can try signing in or changing directories.
Access to this page requires authorization. You can try changing directories.
Visual Studio provides a way to develop, test, and deploy C# class library functions to Azure. If this experience is your first with Azure Functions, see Azure Functions overview.
To get started right away, consider completing the Functions quickstart for Visual Studio.
This article provides detailed information about how to use Visual Studio to develop C# class library functions and publish them to Azure. There are two models for developing C# class library functions: the isolated worker model and the in-process model.
You're reading the isolated worker model version of this article. You can select your preferred model at the top of the article.
You're reading the in-process model version of this article. You can select your preferred model at the top of the article.
Important
Support for the in-process model ends on November 10, 2026. We recommend that you migrate your apps to the isolated worker model.
Unless otherwise noted, procedures and examples shown are for Visual Studio 2022. For more information about Visual Studio 2022 releases, see the release notes or the preview release notes.
Prerequisites
Visual Studio 2022, including the Azure development workload.
Other resources that you need, such as an Azure Storage account, are created in your subscription during the publishing process.
-
If you don't have an Azure account, create a free account before you begin.
Create an Azure Functions project
The Azure Functions project template in Visual Studio creates a C# class library project that you can publish to a function app in Azure. You can use a function app to group functions as a logical unit for easier management, deployment, scaling, and sharing of resources.
From the Visual Studio menu, select File > New > Project.
In the Create a new project dialog, enter functions in the search box, select the Azure Functions template, and then select Next.
In the Configure your new project dialog, for Project name, enter a name for your project, and then select Next. The function app name must be valid as a C# namespace, so don't use underscores, hyphens, or any other nonalphanumeric characters.
In the Additional information dialog, take the actions listed in the following table:
Setting Action Description Functions worker Select .NET 8.0 Isolated (Long Term Support). Visual Studio creates a function project that runs in an isolated worker process. The isolated worker process also supports other versions of .NET and .NET Framework that don't offer long term support (LTS). For more information, see Azure Functions runtime versions overview. Function Select Http trigger. Visual Studio creates a function triggered by an HTTP request. Use Azurite for runtime storage account (AzureWebJobsStorage) Select this checkbox. Because a function app in Azure requires a storage account, one is assigned or created when you publish your project to Azure. An HTTP trigger doesn't use a Storage account connection string. All other trigger types require a valid Storage account connection string. Authorization level Select Anonymous. When you use this authorization setting, any client can trigger the created function without providing a key. This configuration makes it easy to test your new function. For more information, see Authorization level. 
Setting Action Description Functions worker Select .NET 8.0 In-process (Long Term Support). Visual Studio creates a function project that runs in-process with version 4.x of the Functions runtime. For more information, see Azure Functions runtime versions overview. Function Select Http trigger. Visual Studio creates a function triggered by an HTTP request. Use Azurite for runtime storage account (AzureWebJobsStorage) Select this checkbox. Because a function app in Azure requires a storage account, one is assigned or created when you publish your project to Azure. An HTTP trigger doesn't use a Storage account connection string. All other trigger types require a valid Storage account connection string. Authorization level Select Anonymous When you use this authorization setting, any client can trigger the created function without providing a key. This configuration makes it easy to test your new function. For more information, see Authorization level. 
Make sure you set the Authorization level to Anonymous. If you select the default level of Function, you're required to present the function key in requests to access your function endpoint.
Select Create to create the function project and HTTP trigger function.


After you create a Functions project, the project template creates a C# project, installs the Microsoft.Azure.Functions.Worker and Microsoft.Azure.Functions.Worker.Sdk NuGet packages, and sets the target framework.
After you create a Functions project, the project template creates a C# project, installs the Microsoft.NET.Sdk.Functions NuGet package, and sets the target framework.
The new project has the following files:
host.json: This file provides a way for you to configure the Functions host. These settings apply both when running locally and in Azure. For more information, see host.json reference.
local.settings.json: This file maintains settings that you use when you run functions locally. These settings aren't used when your app runs in Azure. For more information, see Work with app settings locally.
Important
Because the local.settings.json file can contain secrets, you must exclude it from your project source control. In the Properties dialog for this file, make sure the Copy to Output Directory setting is set to Copy if newer.
For more information, see Project structure in the isolated worker guide.
For more information, see Functions class library project.
Work with app settings locally
When your function app runs in Azure, settings required by your functions are stored encrypted in app settings. During local development, these settings are instead added to the Values collection in the local.settings.json file. The local.settings.json file also stores settings used by local development tools.
Items in the Values collection in your project's local.settings.json file are intended to mirror items in your function app's application settings in Azure.
Visual Studio doesn't automatically upload the settings in local.settings.json when you publish the project. To make sure that these settings also exist in your function app in Azure, upload them after you publish your project. For more information, see Function app settings. The values in a ConnectionStrings collection aren't published.
Your code can also read the function app settings values as environment variables. For more information, see Environment variables.
Configure the project for local development
The Functions runtime uses a Storage account internally. During development, you can use a valid Storage account for this internal account, or you can use the Azurite emulator.
For all trigger types other than HTTP and webhooks, you need to set the value of the Values.AzureWebJobsStorage key in the local.settings.json file:
- For a Storage account, set the value to the connection string of your storage account.
- For the emulator, set the value to
UseDevelopmentStorage=true.
If you use the emulator, change this setting to an actual storage account connection string before deployment. For more information, see Local storage emulator.
To set the storage account connection string, take the following steps:
Sign in to the Azure portal, and then go to your storage account.
Select Security + networking > Access keys. Under key1, copy the Connection string value.
In your Visual Studio project, open the local.settings.json file. Set the value of the
AzureWebJobsStoragekey to the connection string you copied.Repeat the previous step to add unique keys to the
Valuesarray for any other connections required by your functions.
Add a function to your project
In C# class library functions, the bindings that the functions use are defined by applying attributes in the code. When you create your function triggers from the provided templates, the trigger attributes are applied for you.
In Solution Explorer, right-click your project node and select Add > New Azure Function.
In the Add New Item dialog, select Azure Function, and then select Add.
Select a trigger, and then set the required binding properties. If you select a Storage service trigger and you want to configure the connection, select the checkbox for configuring the trigger connection. The following example shows the settings for creating a Queue Storage trigger function.

Select Add. If you select the checkbox for configuring a storage connection in the previous step, the Connect to dependency page appears. Select an Azurite storage emulator or Azure Storage, and then select Next.
- If you select an Azurite storage emulator, the Connect to Storage Azurite emulator page appears. Take the following steps:
- Select Next.
- On the Summary of changes page, select Finish. Visual Studio configures the dependency and creates the trigger class.
- If you select Azure Storage, the Connect to Azure Storage page appears. Take the following steps:
- Select a storage account, and then select Next. Visual Studio tries to connect to your Azure account and retrieve an endpoint.
- Select Next.
- On the Summary of changes page, select Finish. Visual Studio configures the dependency and creates the trigger class.
This trigger example uses an application setting for the storage connection with a key named
QueueStorage. This key, stored in the local.settings.json file, either references the Azurite emulator or a Storage account.- If you select an Azurite storage emulator, the Connect to Storage Azurite emulator page appears. Take the following steps:
Examine the newly added class. For example, the following C# class represents a basic Queue Storage trigger function:
A
Run()method is attributed withFunction. This attribute indicates that the method is the entry point for the function.using System; using Azure.Storage.Queues.Models; using Microsoft.Azure.Functions.Worker; using Microsoft.Extensions.Logging; namespace Company.Function; public class QueueTriggerCSharp { private readonly ILogger<QueueTriggerCSharp> _logger; public QueueTriggerCSharp(ILogger<QueueTriggerCSharp> logger) { _logger = logger; } [Function(nameof(QueueTriggerCSharp))] public void Run([QueueTrigger("PathValue", Connection = "ConnectionValue")] QueueMessage message) { _logger.LogInformation("C# Queue trigger function processed: {messageText}", message.MessageText); } }A static
Run()method is attributed withFunctionName. This attribute indicates that the method is the entry point for the function.using System; using Microsoft.Azure.WebJobs; using Microsoft.Azure.WebJobs.Host; using Microsoft.Extensions.Logging; namespace Company.Function { public class QueueTriggerCSharp { [FunctionName("QueueTriggerCSharp")] public void Run([QueueTrigger("PathValue", Connection = "ConnectionValue")]string myQueueItem, ILogger log) { log.LogInformation($"C# Queue trigger function processed: {myQueueItem}"); } } }
A binding-specific attribute is applied to each binding parameter supplied to the entry point method. The attribute takes the binding information as parameters.
In the preceding code, the first parameter has a QueueTrigger attribute applied, which indicates a Queue Storage trigger function. The queue name and connection string setting name are passed as parameters to the QueueTrigger attribute. In your class:
- The queue name parameter should match the name of the queue you use in an earlier step to create the trigger, such as
myqueue-items. - The connection string setting name should match the one you use in an earlier step to create the trigger, such as
QueueStorage.
For more information, see Azure Queue storage trigger for Azure Functions.
Use the preceding procedure to add more functions to your function app project. Each function in the project can have a different trigger, but a function must have exactly one trigger. For more information, see Azure Functions triggers and bindings.
Add bindings
As with triggers, input and output bindings are added to your function as binding attributes. To add bindings to a function, take the following steps:
Make sure you configure the project for local development.
Add the appropriate NuGet extension package for each specific binding. For binding-specific NuGet package requirements, see the reference article for the binding. For example, for package requirements for the Azure Event Hubs trigger, see Azure Event Hubs trigger and bindings for Azure Functions.
Use the following command in the Package Manager Console to install a specific package:
Install-Package Microsoft.Azure.Functions.Worker.Extensions.<BINDING_TYPE> -Version <TARGET_VERSION>Install-Package Microsoft.Azure.WebJobs.Extensions.<BINDING_TYPE> -Version <TARGET_VERSION>In this code, replace
<BINDING_TYPE>with the specific name of the binding extension, and replace<TARGET_VERSION>with a specific version of the package, such as4.0.0. Valid versions are listed on the individual package pages at NuGet.org.If there are app settings that the binding needs, add them to the
Valuescollection in the local setting file.The function uses these values when it runs locally. When the function runs in the function app in Azure, it uses the function app settings. Visual Studio makes it easy to publish local settings to Azure.
Add the appropriate binding attribute to the method signature. In the following code, a queue message triggers the
Runfunction. The output binding then creates a new queue message with the same text in a different queue.public class QueueTrigger { private readonly ILogger _logger; public QueueTrigger(ILoggerFactory loggerFactory) { _logger = loggerFactory.CreateLogger<QueueTrigger>(); } [Function("CopyQueueMessage")] [QueueOutput("myqueue-items-destination", Connection = "QueueStorage")] public string Run([QueueTrigger("myqueue-items-source", Connection = "QueueStorage")] string myQueueItem) { _logger.LogInformation($"C# Queue trigger function processed: {myQueueItem}"); return myQueueItem; } }The
QueueOutputattribute defines the binding on the method. For multiple output bindings, you instead place this attribute on a string property of the returned object. For more information, see Multiple output bindings.public static class SimpleExampleWithOutput { [FunctionName("CopyQueueMessage")] public static void Run( [QueueTrigger("myqueue-items-source", Connection = "QueueStorage")] string myQueueItem, [Queue("myqueue-items-destination", Connection = "QueueStorage")] out string myQueueItemCopy, ILogger log) { log.LogInformation($"CopyQueueMessage function processed: {myQueueItem}"); myQueueItemCopy = myQueueItem; } }The
Queueattribute on theoutparameter defines the output binding.The connection to Queue Storage is obtained from the
QueueStoragesetting. For more information, see the reference article for the specific binding.
For a full list of the bindings supported by Functions, see Supported bindings. For a more complete example of this scenario, see Connect functions to Azure Storage using Visual Studio.
Run functions locally
You can use Azure Functions Core Tools to run Functions projects on your local development computer. When you select F5 to debug a Functions project, the local Functions host (func.exe) starts to listen on a local port (usually 7071). Any callable function endpoints are written to the output, and you can use these endpoints for testing your functions. For more information, see Develop Azure Functions locally using Core Tools. You're prompted to install these tools the first time you start a function from Visual Studio.
Important
Starting with version 4.0.6517 of the Core Tools, in-process model projects must reference version 4.5.0 or later of Microsoft.NET.Sdk.Functions. If you use an earlier version, the func start command generates an error.
To start your function in Visual Studio in debug mode, take the following steps:
Select F5. If prompted, accept the request from Visual Studio to download and install Azure Functions Core Tools. You might also need to turn on a firewall exception so that the tools can handle HTTP requests.
When the project runs, test your code the same way you test a deployed function.
When you run Visual Studio in debug mode, breakpoints are hit as expected.
For a more detailed testing scenario that uses Visual Studio, see Test functions, later in this article.
Publish to Azure
When you publish your Functions project to Azure, Visual Studio uses zip deployment to deploy the project files. When possible, you should also select Run from package file so that the project runs in the deployment (.zip) package. For more information, see Run your functions from a package file in Azure.
Don't deploy to Functions by using Web Deploy (msdeploy).
Use the following steps to publish your project to a function app in Azure:
In Solution Explorer, right-click the project and then select Publish.
On the Publish page, make the following selections:
- On Target, select Azure, and then select Next.
- On Specific target, select Azure Function App, and then select Next.
- On Functions instance, select Create new.

Create a new instance by using the values specified in the following table:
Setting Value Description Name A globally unique name The name must uniquely identify your new function app. Accept the suggested name or enter a new name. The following characters are valid: a-z,0-9, and-.Subscription name The name of your subscription The function app is created in an Azure subscription. Accept the default subscription or select a different one from the list. Resource group The name of your resource group The function app is created in a resource group. Select New to create a new resource group. You can also select an existing resource group from the list. Plan Type Flex Consumption When you publish your project to a function app that runs in a Flex Consumption plan, you might pay only for executions of your functions app. Other hosting plans can incur higher costs. IMPORTANT:
When creating a Flex Consumption plan, you must first select App service plan and then reselect Flex Consumption to clear an issue with the dialog.Operating system Linux The Flex Consumption plan currently requires Linux. Location The location of the app service Select a location in an Azure region supported by the Flex Consumption plan. When an unsupported region is selected, the Create button is grayed-out. Instance memory size 2048 The memory size of the virtual machine instances in which the app runs is unique to the Flex Consumption plan. Azure Storage A general-purpose storage account The Functions runtime requires a Storage account. Select New to configure a general-purpose storage account. You can also use an existing account that meets the storage account requirements. Application Insights An Application Insights instance You should turn on Application Insights integration for your function app. Select New to create a new instance, either in a new or in an existing Log Analytics workspace. You can also use an existing instance. 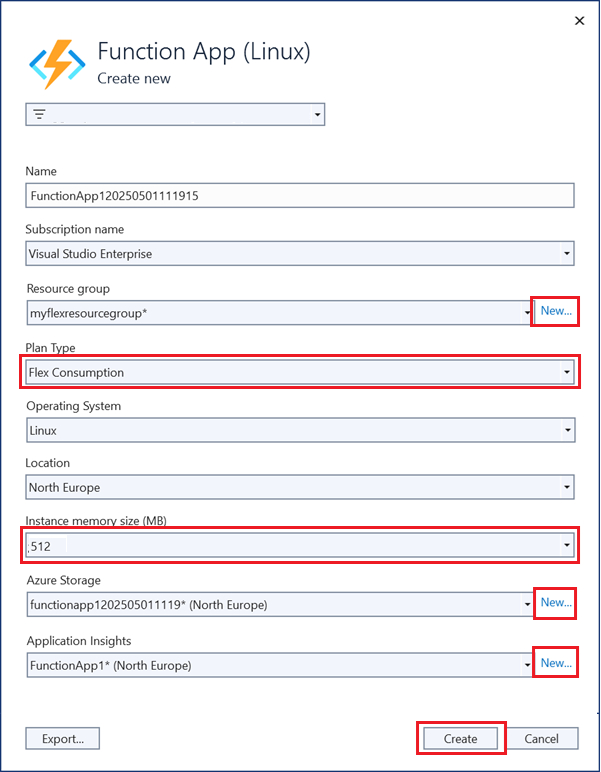
Select Create to create a function app and its related resources in Azure. The status of resource creation is shown in the lower-left corner of the window.
Select Finish. The Publish profile creation progress window appears. When the profile is created, select Close.
On the publish profile page, select Publish to deploy the package that contains your project files to your new function app in Azure.
When deployment is complete, the root URL of the function app in Azure is shown on the publish profile page.
On the publish profile page, go to the Hosting section. Select the ellipsis (...), and then select Open in Azure portal. The new function app Azure resource opens in the Azure portal.


Function app settings
Visual Studio doesn't upload app settings automatically when you publish your project. If you add settings to the local.settings.json file, you must also add them to the function app in Azure.
The easiest way to upload the required settings to your function app in Azure is to manage them in Visual Studio. On the publish profile page, go to the Hosting section. Select the ellipsis (...), and then select Manage Azure App Service settings.

When you make the selection, the Application settings dialog opens for the function app. You can use this dialog to add application settings or modify existing ones.

For each setting, the Local value is the value in the local.settings.json file, and the Remote value is the value in the function app in Azure.
- To create an app setting, select Add setting.
- To copy a setting value from the Local field to the Remote field, select Insert value from Local.
Pending changes are written to the local settings file and the function app when you select OK.
Note
By default, the local.settings.json file isn't checked into source control. As a result, if you clone a local Functions project from source control, the project doesn't have a local.settings.json file. You need to manually create the local.settings.json file in the project root so that the Application settings dialog works as expected.
You can also manage application settings in one of these other ways:
- Use the Azure portal.
- Use the
--publish-local-settingspublish option in the Azure Functions Core Tools. - Use the Azure CLI.
Remote debugging
To debug your function app remotely, you must publish a debug configuration of your project. You also need to turn on remote debugging in your function app in Azure.
This section assumes a debug configuration to your function app is published.
Remote debugging considerations
- Remote debugging isn't recommended on a production service.
- To use remote debugging, you must host your function app in a Premium or App Service plan.
- Remote debugging is currently only supported when running your C# app on Windows.
- If you have the Just My Code feature turned on in Visual Studio, turn it off. For instructions, see Enable or disable Just My Code.
- Avoid long stops at breakpoints when you use remote debugging. When a process is stopped for longer than a few minutes, Azure treats it as an unresponsive process and shuts it down.
- While you're debugging, the server sends data to Visual Studio, which can affect bandwidth charges. For information about bandwidth rates, see Pricing calculator.
- Remote debugging is automatically turned off in your function app after 48 hours. After that point, you need to turn remote debugging back on.
Attach the debugger
When you debug an isolated worker process app, you currently need to attach the remote debugger to a separate .NET process. Several other configuration steps are also required.
To attach a remote debugger to a function app running in a process separate from the Functions host, take the following steps:
On the publish profile page, go to the Hosting section. Select the ellipsis (...), and then select Attach debugger.
Visual Studio connects to your function app and turns on remote debugging if it's not already turned on.
Note
Because the remote debugger can't connect to the host process, an error message might appear. In any case, the local debugger can't access your breakpoints or provide a way for you to inspect variables or step through code.
On the Visual Studio Debug menu, select Attach to Process.
In the Attach to Process dialog, take the following steps:
- Next to Connection type, select Microsoft Azure App Services.
- Next to Connection target, select Find.
In the Azure Attach to Process dialog, search for and select your function app, and then select OK.
If prompted, allow Visual Studio access through your local firewall.
Back in the Attach to Process dialog, select Show processes for all users. Select dotnet.exe, and then select Attach.

When the operation finishes, you're attached to your C# class library code running in an isolated worker process. At this point, you can debug your function app as normal.
To attach a remote debugger to a function app running in-process with the Functions host, take the following steps.
On the publish profile page, go to the Hosting section. Select the ellipsis (...), and then select Attach debugger.
Visual Studio connects to your function app and turns on remote debugging if it's not already turned on. It also locates and attaches the debugger to the host process for the app. At this point, you can debug your function app as normal.
When you finish debugging, you should turn off remote debugging.
Turn off remote debugging
After you finish remote debugging your code, you should turn off remote debugging in the Azure portal. Remote debugging is automatically turned off after 48 hours, in case you forget.
On the publish profile page, go to the Hosting section. Select the ellipsis (...), and then select Open in Azure portal. The Azure portal opens to the function app your project is deployed to.
In the function app, select Settings > Configuration, and then go to the General settings tab. Next to Remote debugging, select Off. Select Save, and then select Continue.
After the function app restarts, you can no longer remotely connect to your remote processes. You can use this same tab in the Azure portal to turn on remote debugging outside of Visual Studio.
Monitor functions
The recommended way to monitor your functions is by integrating your function app with Application Insights. You should turn on this integration when you create your function app during Visual Studio publishing.
If the integration isn't set up during publishing for some reason, you should still turn on Application Insights integration for your function app in Azure.
For more information about using Application Insights for monitoring, see Monitor executions in Azure Functions.
Test functions
This section describes how to create a C# in-process model project that you can test by using xUnit, an open-source unit testing tool for .NET.
Step 1: Setup
Follow these steps to configure the environment, including the app project and functions, required to support your tests:
In Visual Studio, create an Azure Functions project named Functions.
Create an HTTP function from the template:
- In Solution Explorer, right-click the Functions project, and then select Add > New Azure Function.
- In the Add New Item dialog, select Azure Function, and then select Add.
- Select Http trigger, and then select Add.
- Rename the new class MyHttpTrigger.
Create a timer function from the template:
- In Solution Explorer, right-click the Functions project, and then select Add > New Azure Function.
- In the Add New Item dialog, select Azure Function, and then select Add.
- Select Timer trigger, and then select Add.
- Rename the new class MyTimerTrigger.
Create an xUnit Test app in the solution:
- In Solution Explorer, right-click the solution that contains your Functions project, and then select Add > New Project.
- Select the xUnit Test Project template, and then select Next.
- Name the project Functions.Tests.
Remove the default test files from the Functions.Tests project.
Use NuGet to add a reference from the test app to Microsoft.AspNetCore.Mvc. You can use Package Manager Console, or you can take the following steps:
- In Solution Explorer, right-click the Functions.Tests project, and then select Manage NuGet Packages.
- Search for and install Microsoft.AspNetCore.Mvc.
In the Functions.Tests app, add a reference to the Functions app:
- In Solution Explorer, right-click the Functions.Tests project, and then select Add > Project Reference.
- Select the Functions project, and then select OK.
Step 2: Create test classes
In this section, you create the classes that you use to run the automated tests.
Each function takes an implementation of ILogger to handle message logging. In some tests, no messages are logged, or it doesn't matter how logging is implemented. Other tests need to evaluate logged messages to determine whether a test should pass.
Create a class in your Functions.Tests project named
NullScopeand add the following code. This class provides a mock scope. In a later step, you create an implementation ofILoggerthat uses this scope.using System; namespace Functions.Tests { public class NullScope : IDisposable { public static NullScope Instance { get; } = new NullScope(); private NullScope() { } public void Dispose() { } } }Create a class in your Functions.Tests project named
ListLoggerand add the following code. This class maintains an internal list of messages to evaluate during testing. To implement the requiredILoggerinterface, the class uses the mock scope from theNullScopeclass. The test cases pass the mock scope to theListLoggerclass.using Microsoft.Extensions.Logging; using System; using System.Collections.Generic; using System.Text; namespace Functions.Tests { public class ListLogger : ILogger { public IList<string> Logs; public IDisposable BeginScope<TState>(TState state) => NullScope.Instance; public bool IsEnabled(LogLevel logLevel) => false; public ListLogger() { this.Logs = new List<string>(); } public void Log<TState>(LogLevel logLevel, EventId eventId, TState state, Exception exception, Func<TState, Exception, string> formatter) { string message = formatter(state, exception); this.Logs.Add(message); } } }The
ListLoggerclass implements the following members, as contracted by theILoggerinterface:BeginScope: Scopes add context to your logging. In this case, the test points to the static instance on theNullScopeclass to allow the test to function.IsEnabled: A default value offalseis provided.Log: This method uses the providedformatterfunction to format the message. The method then adds the resulting text to theLogscollection.
The
Logscollection is an instance ofList<string>and is initialized in the constructor.Create a code file in the Functions.Tests project named LoggerTypes.cs and add the following code:
namespace Functions.Tests
{
    public enum LoggerTypes
    {
        Null,
        List
    }
}
This enumeration specifies the type of logger that the tests use.
Create a class in the Functions.Tests project named
TestFactoryand add the following code:using Microsoft.AspNetCore.Http; using Microsoft.AspNetCore.Http.Internal; using Microsoft.Extensions.Logging; using Microsoft.Extensions.Logging.Abstractions; using Microsoft.Extensions.Primitives; using System.Collections.Generic; namespace Functions.Tests { public class TestFactory { public static IEnumerable<object[]> Data() { return new List<object[]> { new object[] { "name", "Bernardo" }, new object[] { "name", "Ananya" }, new object[] { "name", "Vlad" } }; } private static Dictionary<string, StringValues> CreateDictionary(string key, string value) { var qs = new Dictionary<string, StringValues> { { key, value } }; return qs; } public static HttpRequest CreateHttpRequest(string queryStringKey, string queryStringValue) { var context = new DefaultHttpContext(); var request = context.Request; request.Query = new QueryCollection(CreateDictionary(queryStringKey, queryStringValue)); return request; } public static ILogger CreateLogger(LoggerTypes type = LoggerTypes.Null) { ILogger logger; if (type == LoggerTypes.List) { logger = new ListLogger(); } else { logger = NullLoggerFactory.Instance.CreateLogger("Null Logger"); } return logger; } } }The
TestFactoryclass implements the following members:Data: This property returns an IEnumerable collection of sample data. The key-value pairs represent values that are passed into a query string.CreateDictionary: This method accepts a key-value pair as an argument. It returns a new instance ofDictionarythat's used to create an instance ofQueryCollectionto represent query string values.CreateHttpRequest: This method creates an HTTP request that's initialized with the given query string parameters.CreateLogger: This method returns an implementation ofILoggerthat's used for testing. TheILoggerimplementation depends on the specified logger type. If a list type is specified, theListLoggerinstance keeps track of logged messages that are available for evaluation in tests.
Create a class in the Functions.Tests project named
FunctionsTestsand add the following code:using Microsoft.AspNetCore.Mvc; using Microsoft.Extensions.Logging; using Xunit; namespace Functions.Tests { public class FunctionsTests { private readonly ILogger logger = TestFactory.CreateLogger(); [Fact] public async void Http_trigger_should_return_known_string() { var request = TestFactory.CreateHttpRequest("name", "Bernardo"); var response = (OkObjectResult)await MyHttpTrigger.Run(request, logger); Assert.Equal("Hello, Bernardo. This HTTP triggered function executed successfully.", response.Value); } [Theory] [MemberData(nameof(TestFactory.Data), MemberType = typeof(TestFactory))] public async void Http_trigger_should_return_known_string_from_member_data(string queryStringKey, string queryStringValue) { var request = TestFactory.CreateHttpRequest(queryStringKey, queryStringValue); var response = (OkObjectResult)await MyHttpTrigger.Run(request, logger); Assert.Equal($"Hello, {queryStringValue}. This HTTP triggered function executed successfully.", response.Value); } [Fact] public void Timer_should_log_message() { var logger = (ListLogger)TestFactory.CreateLogger(LoggerTypes.List); new MyTimerTrigger().Run(null, logger); var msg = logger.Logs[0]; Assert.Contains("C# Timer trigger function executed at", msg); } } }This class implements the following members:
Http_trigger_should_return_known_string: This test uses the query string valuename=Bernardoto create a request to an HTTP function. This test checks that the expected response is returned.Http_trigger_should_return_string_from_member_data: This test uses xUnit attributes to provide sample data to the HTTP function.Timer_should_log_message: This test creates an instance ofListLoggerand passes it to a timer function. After the function runs, the log is checked to make sure the expected message is present.
To access application settings in your tests, you can inject an
IConfigurationimplementation with mocked environment variable values into your function.
Step 3: Run tests
To run the tests in Visual Studio, select View > Test Explorer. In Test Explorer, select Run > Run All Tests in View.

Step 4: Debug tests
To debug the tests, set a breakpoint on a test. In Test Explorer, select Run > Debug Last Run.